Why Make This Recipe
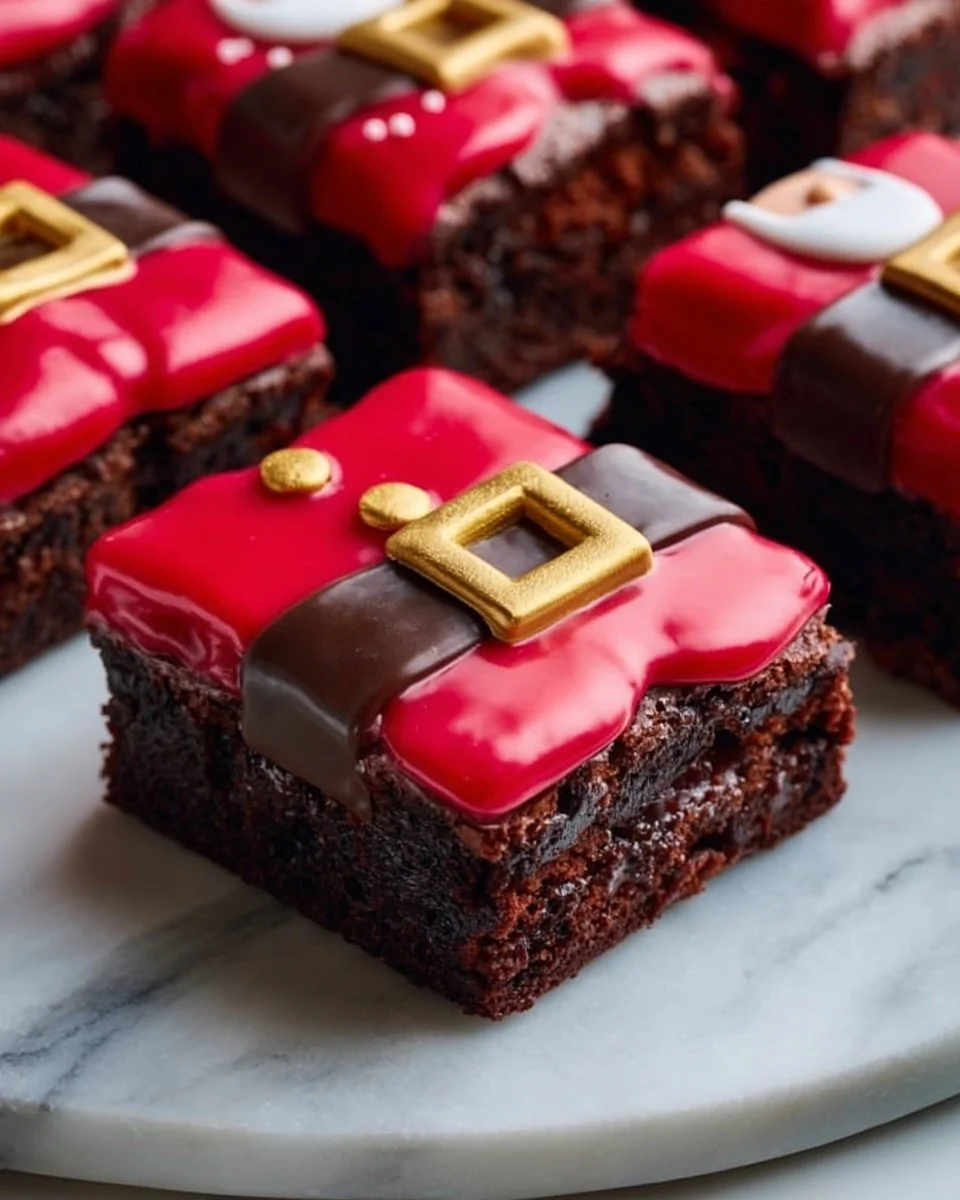
Santa Belly Brownies are a delightful treat perfect for the holiday season. They not only taste great but also bring a fun and festive vibe to any gathering. These brownies are designed to look like Santa’s belly, making them a hit with kids and adults alike.
The combination of rich chocolate, creamy ganache, and playful decorations creates a dessert that’s both pleasing to the eye and the palate. Making these brownies is a great way to celebrate the holidays and share love through baking. Whether you’re hosting a party or making a sweet surprise for friends and family, these brownies are sure to impress everyone.
Equipment Needed for Santa Belly Brownies
To create these fun Santa Belly Brownies, you will need the following equipment:
- 9×13-inch baking pan
- Parchment paper
- Medium saucepan
- Mixing bowls
- Whisk
- Rubber spatula
- Baking sheet (for cooling)
- Sharp knife for cutting
- Rolling pin (for fondant)
- Clean working surface
What You Need to Make Santa Belly Brownies
- 1 cup (2 sticks) unsalted butter
- 8 oz dark chocolate, chopped
- 1 and 1/2 cups granulated sugar
- 1/2 cup brown sugar
- 4 large eggs
- 1 tsp vanilla extract
- 1 cup all-purpose flour
- 1/2 cup unsweetened cocoa powder
- 1/2 tsp salt
- 3/4 cup heavy cream
- 8 oz white chocolate, chopped
- Red gel food coloring
- Black fondant (for the belts)
- Yellow fondant (for the buckles)
- Edible gold dust or gold luster spray
How to Cook Santa Belly Brownies Step by Step
Begin by preheating your oven to 350°F (175°C) and line a 9×13-inch baking pan with parchment paper for easy removal later. In a medium saucepan, add the unsalted butter and chopped dark chocolate. Melt these ingredients together over low heat, stirring consistently until smooth and fully combined. Once melted, remove it from the heat and let it cool slightly.
Next, in a separate mixing bowl, whisk together the granulated sugar, brown sugar, and eggs. Whisk for about 2 to 3 minutes until the mixture becomes pale and fluffy. Adding the vanilla extract now will enhance the flavor of the brownies. Once combined, pour in the cooled chocolate and butter mixture. Stir gently until everything is fully incorporated.
Now, it’s time to add the dry ingredients. Sift the all-purpose flour, cocoa powder, and salt over the chocolate mixture. With a rubber spatula, gently fold these ingredients together until just combined. Be careful not to overmix; the batter should have a few dry streaks remaining.
Pour the brownie batter into the prepared baking pan, spreading it evenly. Place it in the preheated oven and bake for about 30 to 35 minutes. To check for doneness, insert a toothpick into the center of the brownies; it should come out with moist crumbs attached but not wet batter. Once done, remove from the oven and let the brownies cool completely in the pan.
While the brownies are cooling, prepare the white chocolate ganache. In a small saucepan, heat the heavy cream over medium heat until it begins to simmer. Remove it from heat and pour the hot cream over the chopped white chocolate in a bowl. Allow it to sit for about 2 minutes to soften the chocolate, then stir until the mixture is smooth. Next, add red gel food coloring until you achieve your desired festive shade.
Once the brownies are cool, pour the red ganache over the top. Spread it evenly across the surface using an offset spatula. Place the brownies in the refrigerator to chill until the ganache is firm, about 45 minutes to 1 hour.
Once set, it’s time to decorate! Roll out the black fondant into long strips to form Santa’s belts. Cut out little buckles from the yellow fondant and lightly dust them with edible gold dust or gold luster spray for a shiny finish. After decorating, slice the chilled brownies into 12 squares. Adorn each square with the fondant belts and buckles to create the perfect Santa belly look.
How to Make Santa Belly Brownies
Making Santa Belly Brownies is an enjoyable process that ends with a rewarding dessert. Start with simple ingredients and take your time with each step to ensure the best results. From melting chocolate to decorating, immersing yourself in this recipe will make the experience even more fulfilling.
If you’re baking with children, include them in the decorating step to enhance their excitement. Let them roll the fondant and help with the buckles; it’s part of the fun. Remember, even though you’re aiming for a festive appearance, the most important aspect is to enjoy the process.
How to Serve Santa Belly Brownies
Once you’ve cut and decorated your Santa Belly Brownies, it’s time to serve them! Present them on a festive platter or a decorative cake stand, adding some holiday-themed decorations around the brownies for an extra special touch. These brownies are perfect for holiday parties, family gatherings, or as a treat during a cozy evening at home.
To make serving even more fun, consider adding holiday-themed plates and napkins. Place a small card next to the platter with a cheerful holiday message or a fun fact about Santa to spark conversation among guests.
What to Serve with Santa Belly Brownies
Santa Belly Brownies pair wonderfully with a variety of beverages. Consider serving them alongside:
- Hot cocoa topped with whipped cream
- Eggnog for a classic holiday drink
- A warm glass of milk for a comforting treat
- Coffee or espresso to balance the sweetness
These drinks will complement the rich chocolate flavors and enhance the festive atmosphere during your celebrations.
How to Store Santa Belly Brownies
To store your Santa Belly Brownies, first ensure they have cooled completely. Place the brownies in an airtight container for up to 5 days at room temperature. If you’re making them in advance, consider refrigerating them to prolong their freshness. Just be sure to let them come back to room temperature before serving for the best taste and texture.
If you want to keep them even longer, you can freeze the brownies. Wrap individual squares tightly in plastic wrap, then place them in a freezer-safe bag. They can be stored in the freezer for up to 3 months. When ready to enjoy, simply thaw them in the refrigerator or at room temperature.
Tips to Make Santa Belly Brownies
- Ensure your butter and chocolate are melted gently to avoid burning the mixture.
- Mix the ingredients thoroughly but be gentle once you add the dry ingredients to keep the brownies soft and fudgy.
- Allow the ganache to set completely before decorating to prevent the fondant from sinking.
- Use good quality chocolate for both the brownies and ganache. The flavor will significantly impact the overall result.
These tips will help you achieve the best possible brownies while avoiding common pitfalls.
Variation
You can easily customize your Santa Belly Brownies! For example, you could add crushed peppermint candies to the top of the ganache for a minty twist. Or, try incorporating nuts into the brownie batter for added crunch.
If you’d like to get creative, you could alter the decorations. Instead of a Santa belly, why not turn them into elf faces or reindeer using colored fondants and edible decorations?
Best Time to Make Santa Belly Brownies
Santa Belly Brownies are best made during the holiday season, especially in December. They make great desserts for parties, family gatherings, or as gifts for friends and neighbors. You might also consider making them during other festive occasions, like birthdays or winter celebrations.
Baking these brownies can also be a fun family activity during winter break, creating lasting memories while preparing a delicious treat together.
Common Mistakes to Avoid
One common mistake is overbaking the brownies, which can lead to a dry texture. Keep a close eye on them as they bake and check for doneness a few minutes early to ensure they remain fudgy.
Another mistake is melting the chocolate too quickly or at too high a temperature, which can result in a burnt taste. Use low heat and stir consistently to achieve the best results.
Lastly, be cautious when adding the food coloring to the ganache. It’s easier to add more than to correct an overly dark color, so start with a small amount.
Nutritional Notes
While these brownies are a treat and should be enjoyed in moderation, they do contain ingredients that can offer some nutritional benefits. Dark chocolate is known for containing antioxidants, and eggs provide protein. However, the sugar and fat content in these brownies should be considered as part of a balanced diet.
FAQs
Can I use cocoa powder instead of melted chocolate for the brownies?
While you could use cocoa powder, the texture and flavor will change. Melted chocolate adds richness that cocoa powder may not provide.
How long do Santa Belly Brownies last?
When stored properly in an airtight container, they can last for 5 days at room temperature or up to 3 months in the freezer.
Can I make this recipe gluten-free?
Yes, you can substitute all-purpose flour with a gluten-free flour blend. Make sure to check that all other ingredients are also gluten-free.
Conclusion
Santa Belly Brownies are a delightful addition to any holiday celebration. With their rich chocolate base, luscious red ganache, and festive decorations, they encourage creativity and joy while baking. By following the steps provided, you can create a memorable dessert that brings smiles to faces young and old.
Whether you serve them at a party, enjoy them with family, or gift them to friends, these brownies will surely become a favorite. So gather your ingredients, get your family involved, and have fun making this special treat!