Why Make This Recipe
The Christmas Tree Charcuterie Board is a delightful addition to any holiday gathering. It adds a festive touch to your table and provides a scrumptious selection of flavors. Plus, this fun presentation style impresses guests of all ages, making it an ideal centerpiece for Christmas celebrations.
Creating this charcuterie board is not only about the tasty ingredients but also about the excitement of assembling it. Gathering friends and family around this beautiful board can enhance the joy of the holiday season. It allows everyone to nibble at their leisure while enjoying each other’s company.
Equipment Needed for Christmas Tree Charcuterie Board
To make your Christmas Tree Charcuterie Board, you will need a few basic tools:
- A large rectangular wooden board or platter
- A sharp knife for cutting cheese and fruits
- Small cookie cutters in star and snowflake shapes
- Tongs for easy serving
- Toothpicks for building the tree
Having these tools ready will make your preparation smooth and enjoyable.
What You Need to Make Christmas Tree Charcuterie Board
Gather these ingredients for your Christmas Tree Charcuterie Board:
- Italian Dry Salame
- Prosciutto
- 2 Kiwis
- Blueberries
- Raspberries
- Wensleydale with Cranberries
- Small Mozzarella Cheese Pearls
- Muenster Cheese Slices (cut into snowflake and star shapes)
- Green olives
- Almonds
- Round Crackers
- Pretzel Sticks
- Rosemary for garnish
With these ingredients on hand, you are set to create a mouthwatering festive display.
How to Cook Christmas Tree Charcuterie Board Step by Step
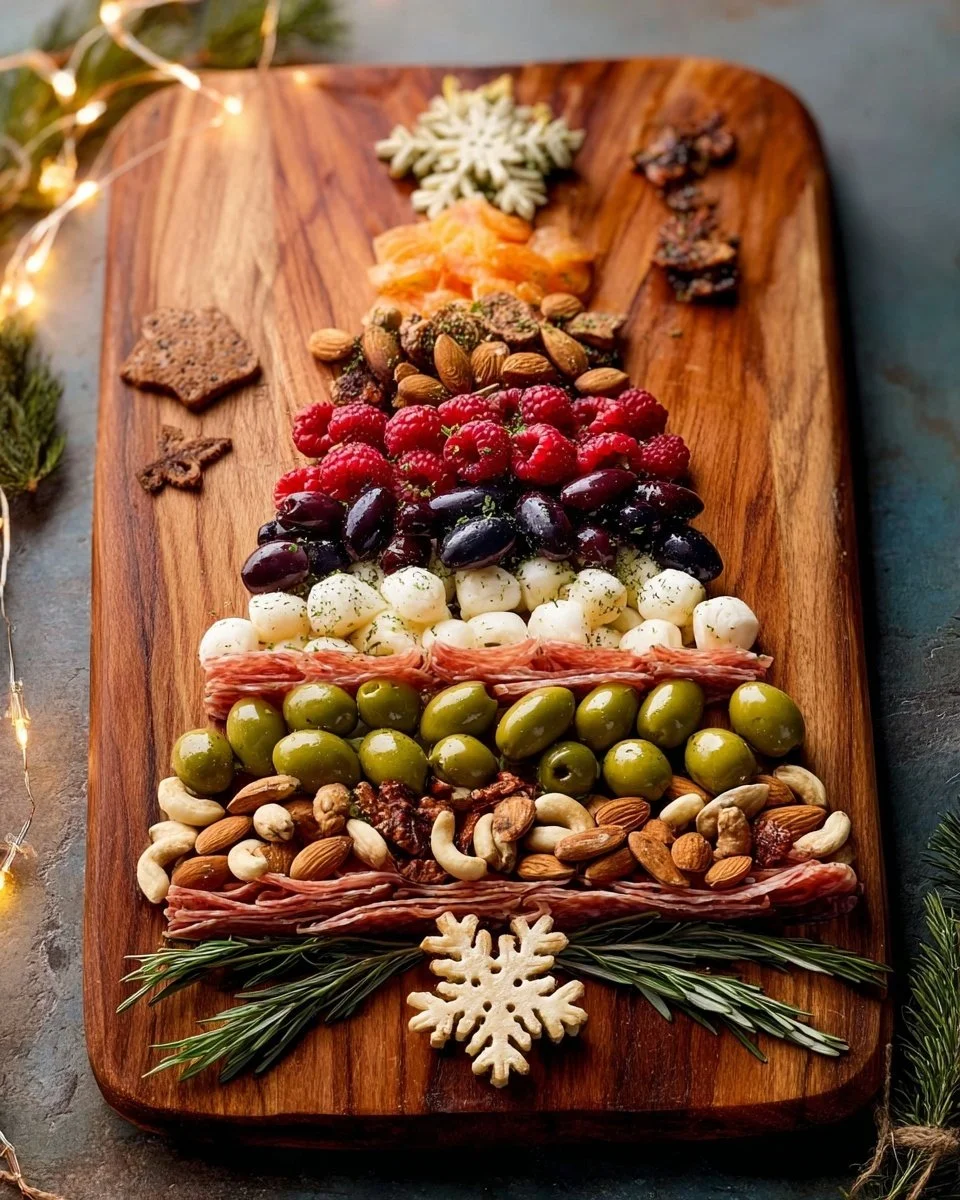
Start your creation by taking the large rectangular wooden board. Place it flat on your workspace so you have plenty of room to build. Begin at the top of the tree shape by arranging a handful of almonds. This serves as the star or top decoration of your Christmas tree.
Next, layer down underneath the almonds to form the shape of the tree. Place the green olives at the next level, following it up with strips of prosciutto. Raspberries are a beautiful next layer, followed by small mozzarella cheese pearls. The combination of colors and textures will start to resemble a festive tree.
Continue building up your tree with slices of Italian dry salame. Use blueberries next to create a playful contrast and outline. At the bottom layers, place slices of Wensleydale cheese with cranberries. The fruity flavor pairs perfectly with those savory elements.
Slice up your kiwis and arrange them around the base of your charcuterie tree. Their vibrant green color will catch the eye and enhance your display. Next, take some round crackers and position them around the tree, creating a grounding effect for your creation.
For a whimsical touch, cut the muenster cheese into fun snowflake and star shapes using your cookie cutters. Scatter these around your Christmas tree, adding an artistic flair to your board. Finally, finish your design by garnishing the entire board with sprigs of rosemary. This adds a delightful aroma and a touch of greenery.
How to Make Christmas Tree Charcuterie Board
Making your Christmas Tree Charcuterie Board is all about creativity. As you assemble your ingredients, think about colors and visual appeal. Feel free to mix and match items, making sure to include a variety of textures and flavors.
Begin by laying out your board in an open area. You want to ensure there is enough space to build your tree without feeling cramped. Take your time to be thoughtful about what goes where. Don’t rush; the joy of making this dish lies in the process itself.
Each layer you add builds not just the visual aspect but also the flavor repertoire. You can also squeeze in small items like pretzel sticks between larger pieces to fill gaps. This not only looks appealing but also enhances your visitors’ experience by adding crunch.
When you finish arranging the ingredients, take a moment to step back and appreciate your work. Think about how inviting your board looks; it’s ready for guests to enjoy.
How to Serve Christmas Tree Charcuterie Board
Serving your Christmas Tree Charcuterie Board is simple yet sets the tone for fun and celebration. Once your creation is complete, place it front and center on your dining table or party spread.
Encourage everyone to dig in and enjoy at their own pace. You can provide small plates and toothpicks for easy serving. This makes it effortless for guests to mix and match based on their personal taste.
Additionally, be mindful of dietary restrictions among your guests. Having a variety of meats and cheeses allows everyone to find something they love. If anyone has allergies, consider making a separate section on the board or keeping certain ingredients in individual bowls nearby.
What to Serve with Christmas Tree Charcuterie Board
The Christmas Tree Charcuterie Board is delicious on its own, but you may want to complement it with additional sides. Consider serving a festive punch or mulled wine to create a cozy atmosphere.
Fresh vegetable platters with dip can make a nice crunchy contrast. A selection of fruit, like sliced apples or pears, can add variety as well. Consider sweet treats like chocolate-covered pretzels for those with a sweet tooth.
Cheese biscuits or soft bread can also be served alongside. These pair wonderfully with the various flavors on the charcuterie board. You can even set out some flavored spreads or jams for guests to try.
How to Store Christmas Tree Charcuterie Board
If there are leftovers after your celebration, you will want to store them properly. Keeping the integrity of each ingredient helps maintain their flavors and textures.
First, prepare for storage by wrapping any perishable items tightly in plastic wrap. For cheeses, this is particularly important to avoid drying out. You can also place them in airtight containers.
Non-perishable items, such as crackers or almonds, can stay in their original packaging. Just ensure they are sealed tightly to maintain freshness. When storing, try to keep like items together to keep the flavors distinct.
If you need to, consume leftovers within a couple of days for the best taste. Always check for quality before enjoying any chilled or stored foods.
Tips to Make Christmas Tree Charcuterie Board
For the best results while making your Christmas Tree Charcuterie Board, consider these helpful tips. First, select the freshest ingredients to ensure vibrant flavors. Fresh berries and quality meats will elevate your board significantly.
Plan your layout ahead of time. Visualizing the arrangement before you begin assembling can save you time and energy as you build. Don’t be afraid to experiment with different placements; sometimes, the best designs come from spontaneity.
Consider the theme of your holiday decorations. You can match colors or themes between food and tableware to create a cohesive look. This small detail can make a big difference in your holiday display.
Finally, engage your guests in the assembly process. This can add an interactive and social element to your gathering. Guests can share their favorite picks and make it a fun experience.
Variation
While the Christmas Tree Charcuterie Board is delicious as is, consider personalizing it to suit your preferences. You might add a variety of cheeses or meats based on what you enjoy the most.
For a twist, incorporate holiday-themed cookies or treats to the board. These can add sweetness and charm, enhancing the festive atmosphere. Even various nuts or seeds can serve as substitute or additional toppings for added crunch.
Feel free to explore seasonal fruits as they become available. Depending on your region, fresh pomegranates can add a pop of color and tartness. Your board is only limited by your imagination!
Best Time to Make Christmas Tree Charcuterie Board
The ideal time to prepare your Christmas Tree Charcuterie Board is on the day of your event, preferably a few hours prior to serving. This ensures the freshest flavors and prevents ingredients like fruits from wilting.
However, if you are short on time, you can do some prep in advance. Slice meats and cheeses a day before, and store them in airtight containers. Assembly can then happen just before guests arrive.
Aim for a timeline that allows enough time for a little creativity in the assembly process. Taking your time is key to creating a beautiful board.
Common Mistakes to Avoid
Making a Christmas Tree Charcuterie Board can be easy, but there are a few common mistakes to steer clear of. First, do not overload the board with too many ingredients. Select a balance of flavors and textures to keep it inviting.
Avoid using overly ripe or bad-quality fruits and cheeses. They not only look unappealing but can also affect the taste negatively. Always pick the best options available at your grocery store.
When arranging, be mindful of spacing. A tightly packed board can look overwhelming. Instead, leave some space between different items for a cleaner presentation and more accessibility.
Nutritional Notes
While the Christmas Tree Charcuterie Board is a treat, keep in mind the nutritional aspects of the ingredients you choose. Ingredients like cured meats and cheeses tend to be high in salt and fat. Moderation is essential.
Similarly, the fruits and nuts will add fiber and beneficial vitamins, while adding a fresh taste. Balance is key.
Being aware of portion sizes means you can enjoy this festive board without worry. Sharing among friends makes it even easier to indulge.
FAQs
Can I make the Christmas Tree Charcuterie Board ahead of time?
You can prepare some elements in advance, such as slicing meats and cheeses. It’s best to assemble the board just before serving for maximum freshness.
What if I have dietary restrictions among my guests?
Be sure to ask in advance about any dietary restrictions. You can adjust the ingredients accordingly, offering gluten-free crackers or vegetarian options.
How can I make it more kid-friendly?
Add in fun, child-friendly ingredients such as mini pretzels, fruit shaped into fun designs, or even some sweet treats like chocolate.
Conclusion
The Christmas Tree Charcuterie Board is a festive and delicious way to celebrate the holiday season. It combines colorful ingredients and delightful flavors to create a visually appealing centerpiece for any gathering. Taking the time to assemble this board allows for delightful conversations and shared experiences among friends and family.
By following the tips and directions provided, you can create your version of this charming layout. Enjoy the process, embrace your creativity, and most importantly, have fun as you enjoy the holiday spirit.