Why Make This Recipe
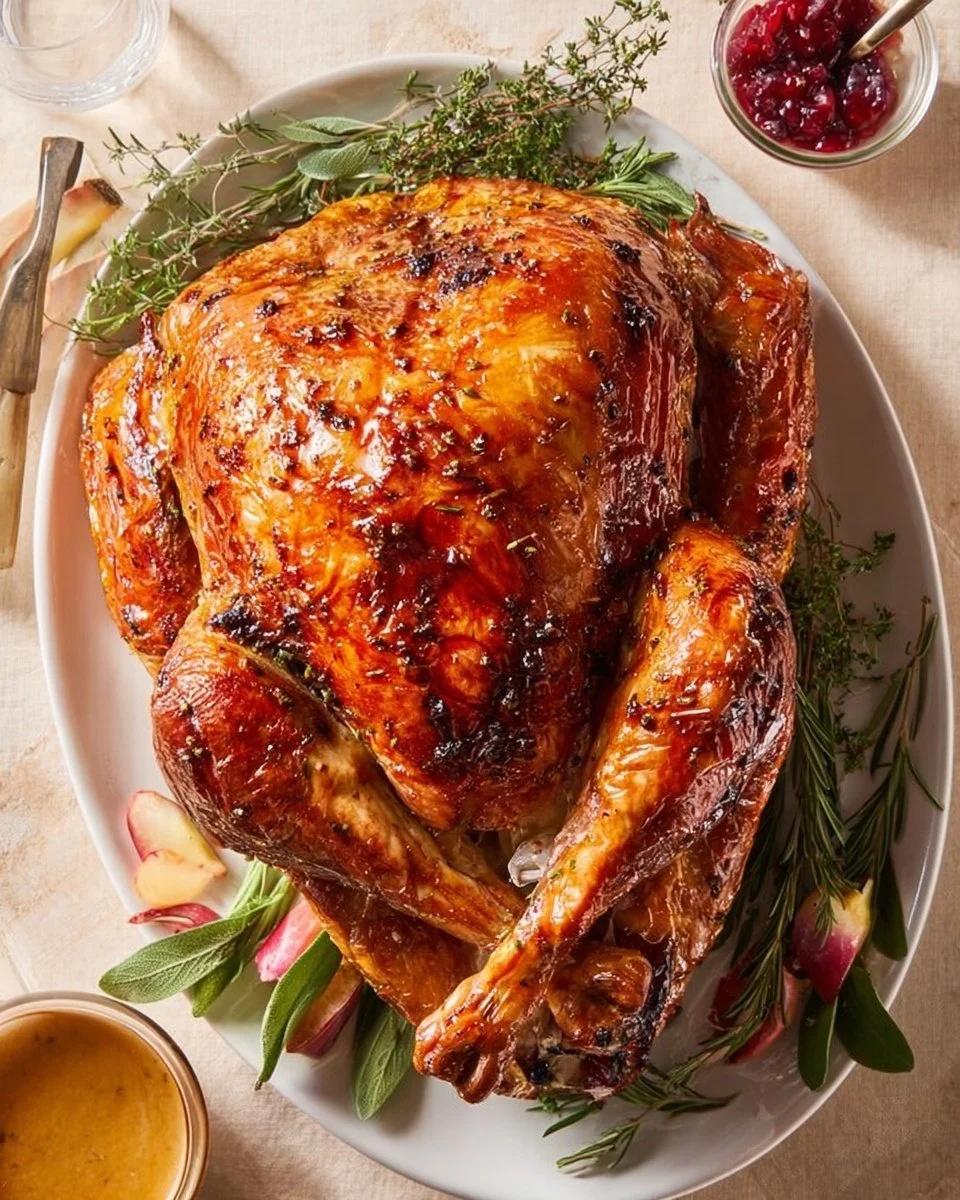
Dry brining a turkey makes it deliciously juicy and flavorful. This method allows the salt to penetrate the meat, enhancing its natural flavor while keeping it moist during cooking. It’s an easy way to elevate your turkey without much extra effort. By using simple ingredients, you can create a succulent centerpiece for your holiday table.
Additionally, dry brining helps to achieve crispy skin, which is often desired when roasting a turkey. With just a bit of time and preparation, you can transform a basic turkey into a show-stopping dish that’s sure to impress your guests.
Equipment Needed for How To Dry Brine A Turkey
- Large roasting pan
- Paper towels
- Small bowl
- Basting brush
- Kitchen twine
- Roasting rack
- Instant-read thermometer
What You Need to Make How To Dry Brine A Turkey
- 1 (8-lb.) whole turkey
- 2 Tbsp. kosher salt
- 1 Tbsp. granulated sugar
- 3 cloves garlic, finely chopped
- 6 Tbsp. unsalted butter, melted
- 2 tsp. fresh thyme leaves
- Pinch of crushed red pepper flakes
- Freshly ground black pepper
How to Cook How To Dry Brine A Turkey Step by Step
Two days before cooking, start by removing the giblets from the turkey’s cavity. This is often found in a small bag inside the turkey. After removing them, pat the turkey dry with paper towels. A dry surface is important for the salt mixture to adhere properly.
In a small bowl, combine the kosher salt and granulated sugar. The sugar helps to balance the saltiness and enhances the overall flavor. Rub this mixture all over the turkey, paying extra attention to the thicker parts of the meat, such as the breast area. Make sure to cover the entire surface to ensure even seasoning.
Place the turkey in a large roasting pan. It’s important to leave the turkey uncovered while it refrigerates, which allows the skin to dry out for that perfect crispy finish later. Refrigerate the turkey for two full days, which will allow ample time for the salt to deeply flavor the meat.
One hour before you’re ready to cook, carefully drain any liquid that may have accumulated at the bottom of the roasting pan. Use paper towels to pat the turkey dry once more, removing excess moisture. Bring the turkey to room temperature by letting it sit out for about an hour before cooking. This helps it cook evenly.
When it is finally time to roast, preheat the oven to 425 degrees Fahrenheit. In a medium bowl, combine the finely chopped garlic, melted butter, thyme leaves, crushed red pepper flakes, and a few grinds of black pepper. This mixture will add lots of flavor to the turkey. Brush about half of this garlic mixture all over the surface of the turkey, ensuring it is spread evenly.
Next, tie the legs of the turkey together with kitchen twine. This helps the turkey cook evenly and maintains its shape during roasting. Place the turkey on a roasting rack inside the roasting pan so that the heat can circulate around it.
Roast the turkey for about 45 minutes at 425 degrees, brushing it with the remaining garlic mixture halfway through. Keep an eye on the skin; if it begins to brown too quickly, use foil to cover the turkey and prevent burning.
After 45 minutes, reduce the oven temperature to 375 degrees Fahrenheit. Continue to roast the turkey until the skin has turned a beautiful golden brown, about another 45 minutes. To ensure it’s fully cooked, use an instant-read thermometer. Insert it into the thickest part of the breast; it should read 160 degrees Fahrenheit when done.
Once cooked, remove the turkey from the oven and let it rest for 15 minutes before slicing. This resting period allows the juices to redistribute, making for a more tender and juicy turkey.
How to Make How To Dry Brine A Turkey
Making a dry-brined turkey starts well in advance. The key step is the brining process, which requires a couple of days of refrigeration. This method not only ensures the meat is seasoned deeply but also helps to achieve that desired moisture throughout the turkey.
The mixture of salt and sugar is crucial, so mixing these two well before applying is essential. Rubbing it evenly contributes to a consistent flavor profile. After applying the mixture, the refrigeration phase is what truly transforms your turkey from ordinary to extraordinary.
The combination of garlic and herbs in the butter mixture is the final touch that enhances the turkey flavor. By basting the turkey during roasting, you introduce more flavors, making each bite just perfect.
How to Serve How To Dry Brine A Turkey
Once your turkey is roasted to perfection, how you serve it matters. Start by placing it on a large cutting board or serving platter. Ensure to have a sharp carving knife on hand for slicing.
Begin by carving the turkey at the breast, making smooth and even slices. This way, each guest can enjoy juicy portions. Remember to also serve the legs and thighs, as they offer delicious dark meat options.
Offer some of the pan drippings alongside the turkey for added flavor. These drippings can be turned into a delicious gravy. Adding a sprinkle of fresh herbs on top of the turkey just before serving can make it visually appealing and flavor-enhancing.
What to Serve with How To Dry Brine A Turkey
When planning your meal, consider classic side dishes that complement turkey. Mashed potatoes are a perfect pairing, absorbing any juices and gravy served alongside the turkey.
Green beans or steamed broccoli add a fresh vegetable option, balancing the richness of the turkey. Stuffing or dressing is another traditional side that pairs well with turkey, best enjoyed with gravy ladled on top.
Cranberry sauce provides a sweet and tangy contrast to the savory turkey flavors. Additionally, some warm dinner rolls can help soak up all the delicious drippings. Together, these sides create a well-rounded holiday meal.
How to Store How To Dry Brine A Turkey
Leftover turkey can be stored easily if done properly. Allow any remaining turkey to cool to room temperature, but do not leave it out for more than two hours to ensure food safety.
Once cooled, slice the turkey into portions for more manageable storage. Place the slices in an airtight container, layering them with parchment paper if necessary to avoid sticking.
Store the turkey in the refrigerator for up to four days. If you want to extend its shelf life, consider freezing the turkey. Just make sure to wrap the portions tightly in plastic wrap and then place them in a freezer-safe bag. This can keep the turkey good for up to three months.
Tips to Make How To Dry Brine A Turkey
To ensure the best results, it’s beneficial to invest in a quality instant-read thermometer. This tool is essential for checking the internal temperature accurately.
Remember to dry the turkey thoroughly before applying the brine. This extra step helps the brine adhere better and contributes to crispy skin.
Additionally, don’t skip the resting time after cooking. Allowing the turkey to rest ensures it remains juicy and flavorful.
Feel free to adjust the seasoning in the garlic-butter mix to cater to your family’s tastes. Adding herbs like rosemary or oregano can personalize your turkey experience.
Variation of How To Dry Brine A Turkey
While the basic dry brine recipe is fantastic, you can experiment with flavors. For instance, replacing some of the kosher salt with seasoning blends can add depth.
Try infusing the butter mixture with citrus zest for a bright flavor. Lemon or orange can provide a refreshing twist to the garlic and herb mix.
Using different fresh herbs, like sage or parsley, can also alter the taste profile significantly without complicating the process.
Best Time to Make How To Dry Brine A Turkey
The best timing for dry brining a turkey is at least two days prior to when you plan to serve it, especially for larger birds. Planning your meal ahead allows for ample time to prepare and ensures maximum tenderness and flavor.
If you are preparing for a holiday feast, start this process a couple of days before the celebration. This ensures your turkey is ready and allows you to focus on other aspects of the meal.
Common Mistakes to Avoid
One common mistake is not allowing the turkey to rest after cooking. This can lead to dry meat. Always let it rest for the recommended time.
Another mistake is not drying the turkey properly before brining. Moisture can hinder the brining process and prevent that crispy skin everyone loves.
Overbasting can also lead to uneven cooking; instead, aim to brush gently and evenly as required. Additionally, make sure to monitor cooking time carefully based on your specific turkey and oven.
Nutritional Notes
A typical serving of roasted turkey, without skin, contains about 25 grams of protein. It’s low in carbohydrates and rich in essential nutrients. However, the added butter and seasoning can increase the overall calorie count, so be mindful of portion sizes if you’re watching your diet.
FAQs
1. Can I dry brine a turkey with flavored salts?
Yes, flavored salts can be used, but adjust the amount since they may be saltier than regular kosher salt.
2. Do I need to rinse the turkey after brining?
No, rinsing is not necessary; this will wash away the flavor. Just pat it dry before roasting.
3. What if my turkey is larger or smaller than 8 lbs?
Adjust the brine proportionally based on the size of the turkey. Use about 1 tablespoon of salt per 5 pounds of turkey.
Conclusion
Dry brining your turkey is an excellent way to enhance its flavor and keep it moist. With minimal ingredients and straightforward steps, you can make an impressive dish with ease.
This method requires some planning, but the rewards of juicy and flavorful turkey are well worth it. Give it a try for your next holiday meal, and watch everyone enjoy the delicious results.