Why Make This Recipe
Brining a turkey is one of the best ways to ensure that your bird stays moist and full of flavor. By soaking the turkey in a brine solution, you infuse it with seasonings and add moisture, which is essential for a perfect roast. This technique is especially beneficial for larger turkeys that can often end up dry if not prepared properly.
Not only does brining enhance the turkey’s taste, but it also helps to break down some of the muscle fibers, yielding a more tender texture. Using a homemade turkey brine like this one combines fresh herbs and citrus, creating a deliciously savory balance that elevates your Thanksgiving feast.
Equipment Needed for Turkey Brine
To prepare a turkey brine, you will need a few essential pieces of equipment. First, you need a large pot or container where you can mix the brine ingredients and submerge the turkey. A stockpot is often ideal for this task. Alternatively, you could opt for a clean, food-safe bucket.
Additionally, having measuring cups and spoons will help you precisely measure out the ingredients. A large spoon for stirring is also necessary, along with a gallon-sized resealable plastic bag or an additional container for brining if the turkey is too large for the pot you have.
What You Need to Make Turkey Brine
- 1 orange, cut into rounds
- 1 lemon, cut into rounds
- 6 cloves garlic, smashed
- 4 sprigs fresh rosemary
- 4 sprigs fresh sage
- 4 dried bay leaves
- 1 cup kosher salt
- 1/2 cup packed light brown sugar
- 1 Tbsp. black peppercorns
- 1 tsp. allspice berries (optional)
- 2 gal. water, divided
- 1 whole turkey (12 to 14 lbs), neck and giblets removed
How to Cook Turkey Brine Step by Step
To start making your turkey brine, take a large pot and place it over medium heat on your stove. Begin by adding your orange and lemon rounds, smashed garlic, sprigs of fresh rosemary and sage, bay leaves, kosher salt, light brown sugar, black peppercorns, and allspice berries if you choose to use them.
Add half a gallon of water into the pot and stir the mixture well. Your goal here is to bring this concoction to a boil. Keep stirring frequently, watching for the salt and sugar to dissolve completely. After about five minutes of boiling, you should see a clear mixture without any granules of salt or sugar remaining.
Once everything has dissolved, remove the pot from the heat. Now, it’s time to add the remaining one and a half gallons of water. This step cools down your brine solution. Stir it well to incorporate everything and set it aside, allowing it to cool completely, which should take about an hour.
Next, take your whole turkey, making sure the neck and giblets have been removed from the cavity. You can place the turkey in the pot if it fits. If not, consider using a large, food-safe resealable plastic bag or an alternate container. Pour the brine over the turkey until it is fully submerged. If you’re using a bag, squeeze out any excess air before sealing it.
Let the turkey soak in the brine for at least overnight, but if you have time, aim for a full 24 hours. This duration allows the flavors to penetrate the meat thoroughly. Once you’re ready to cook, take the turkey out of the brine. It’s crucial to rinse the turkey inside and out under cool water to remove excess salt. Finally, pat it dry with paper towels to prepare it for roasting.
How to Make Turkey Brine
Making turkey brine is a straightforward process. The essential part is balancing the salty and sweet flavors with various spices and herbs. Start feature with fresh ingredients like citrus, garlic, and herbs for the most vibrant taste. The key is to use kosher salt and brown sugar, as they dissolve easily and enhance the meat’s flavor.
You can experiment with your brine by adding different spices or aromatics depending on your preference. The provided recipe gives an excellent foundation to craft a flavorful solution that will complement your turkey beautifully.
When preparing to brine, ensure your turkey is adequately cleaned and any internal parts are removed, as they can harbor bacteria. Following these straightforward steps will ensure your turkey is well prepared for roasting.
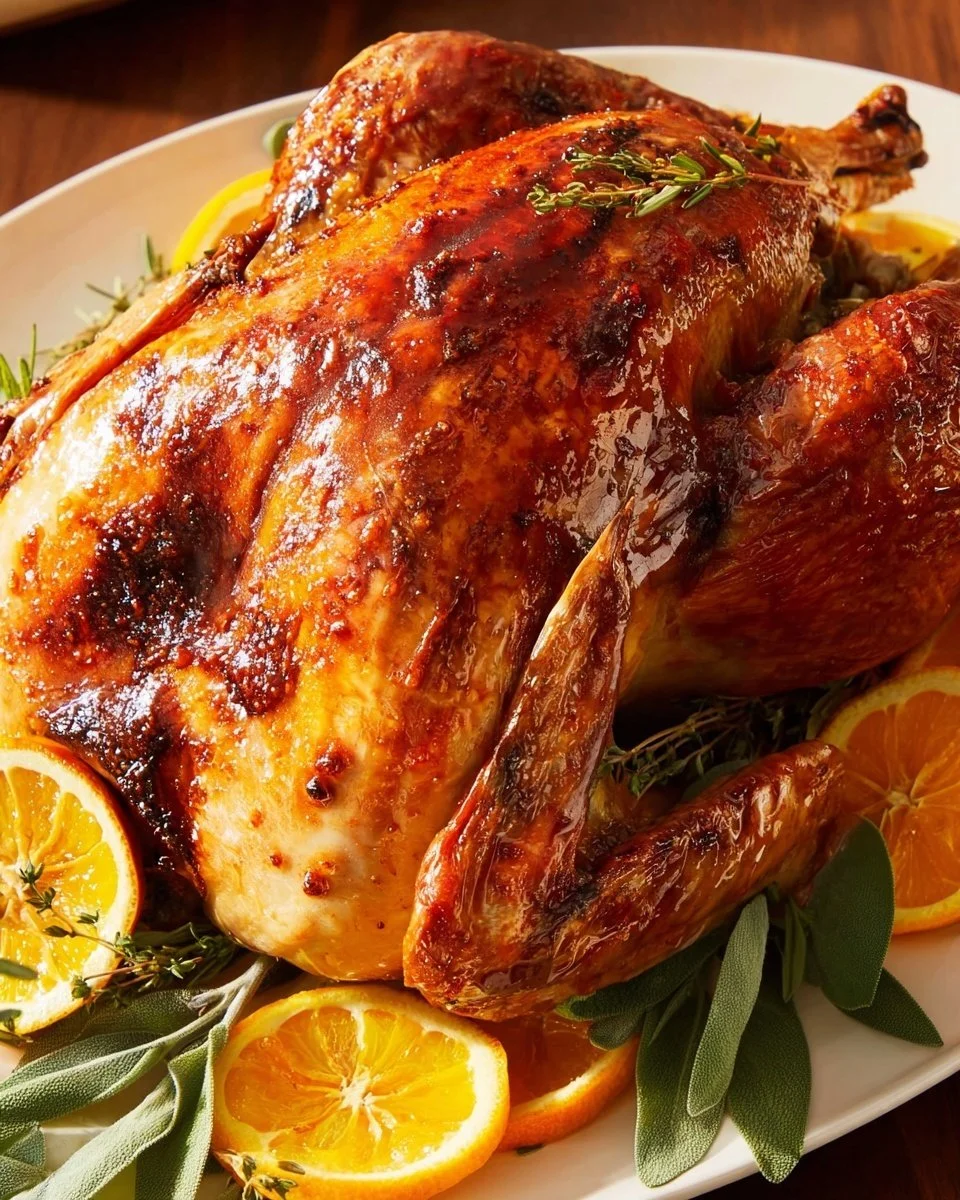
How to Serve Turkey Brine
After brining, it’s essential to focus on how you present your turkey. Once you’ve rinsed and dried the turkey, you can season it as desired. Classic options include butter, garlic, and herbs, which can be rubbed under the skin and all over the meat.
When the turkey is cooked to perfection, carve it on a large platter for a beautiful presentation. Letting it rest after cooking is also crucial. This rest period allows the juices to redistribute evenly, resulting in juicy, flavorful meat for everyone to enjoy.
Serve the carved turkey with your favorite sides to complete the meal. A well-cooked turkey steals the show, especially when prepared with a great brine.
What to Serve with Turkey Brine
There are numerous delightful side dishes that pair perfectly with brined turkey. Classic options include stuffing, mashed potatoes, and green bean casserole. Roasted vegetables are also a excellent addition, providing a colorful and healthy option.
For something lighter, consider a fresh salad with a zesty vinaigrette. Cranberry sauce offers a deliciously sweet and tart contrast to the savory turkey flavors. And don’t forget to include warm dinner rolls to soak up any delicious gravy created from the turkey drippings.
Setting the table with a variety of options allows your guests to customize their plates, creating a festive atmosphere where everyone can enjoy.
How to Store Turkey Brine
If you have leftover brine or brined turkey, it’s important to store it properly for safety. The brine itself can be kept in an airtight container in the fridge, but it’s best used within a week.
If you’ve brined your turkey but have leftovers after cooking, be sure to refrigerate any leftover turkey within two hours of serving. To do this, carve the turkey and place the slices in an airtight container. Leftover turkey can stay fresh in the refrigerator for about three to four days.
You can also freeze portions for longer storage. Ensure it’s in a freezer-safe container to maintain quality, and consume within a few months for the best flavor.
Tips to Make Turkey Brine
To elevate your turkey brine experience, consider a few helpful tips. First, always use fresh ingredients when possible; they make a significant difference in flavor.
Ensure that the brine is completely cooled before adding the turkey, as placing a hot solution can start cooking the meat.
Another tip is to weigh down the turkey if it floats above the brine to guarantee even flavor distribution. You can use a plate or any clean weight that fits in your container.
Lastly, feel free to adjust the herbs and spices according to your taste preferences. Different combinations will create unique flavors, so don’t hesitate to experiment.
Variation
You can easily customize this turkey brine recipe. For example, you can add other herbs like thyme or dill and even swap in maple syrup instead of brown sugar for a different flavor profile.
Some also enjoy incorporating cider or beer into the brine for added depth. If you’re looking for a spicier kick, consider adding red pepper flakes or a touch of hot sauce to the brine mixture.
There are endless possibilities, so feel free to get creative with your ingredients while maintaining the basic balance of salt and sugar.
Best Time to Make Turkey Brine
The best time to make turkey brine is during the holiday season, particularly before Thanksgiving. If you are planning to host family and friends, prepare the brine the day before you need to place it in the turkey.
Taking time to brine ensures the turkey is flavorful, tender, and juicy. And it’s also ideal for special occasions like Christmas or whenever you are serving a large crowd.
For best results, plan your brining process ahead of time, allowing enough time for the turkey to soak in the brine before roasting it.
Common Mistakes to Avoid
When making turkey brine, there are a few common mistakes to keep in mind. One major error is not using enough water or salt, which can lead to a bland turkey. Always follow the measurements to ensure a well-balanced brine.
Another mistake is not allowing the brine solution to cool down sufficiently before adding the turkey. This mistake can start the cooking process early, resulting in uneven cooking.
Finally, be cautious about brining for too long; over-brining can lead to excessively salty turkey. Stick to the guidance of 12 to 24 hours for the best outcome.
Nutritional Notes
Brining turkey may add some amount of sodium due to salt in the brine. However, this process also allows for better moisture retention without significant impact on overall calories.
Brined turkey is often more enjoyable, encouraging people to savor their meals more, which is an essential part of the holiday experience. Enjoy responsibly and relish the flavors!
FAQs
Can I use any salt for brining?
It’s best to use kosher salt because it dissolves easily and provides even distribution. Table salt is much denser, so adjustments would be needed.
Should I rinse my turkey after brining?
Yes. Rinsing helps to remove excess salt from the turkey. This step is crucial in avoiding overly salty meat.
How long can I brine a turkey?
You can brine a turkey for a minimum of 12 hours and up to 24 hours. This time frame allows flavors to infuse without resulting in excessive saltiness.
Conclusion
Brining your turkey is a simple but rewarding method to ensure a juicy, flavorful feast. With a few fresh ingredients and a bit of time, you can create a brine that makes your turkey the star of any occasion. Whether it’s Thanksgiving, Christmas, or a family gathering, taking the time to prepare a brined turkey will leave a lasting impression on everyone at the table. Enjoy the process, and happy cooking!